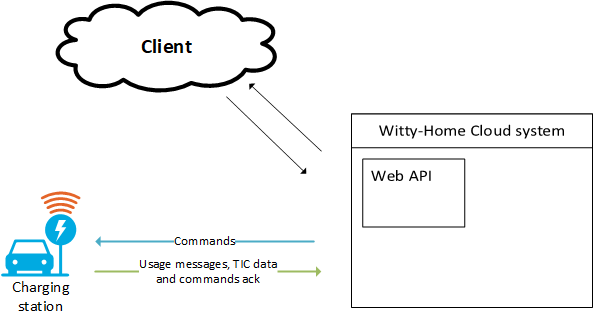
Figure 1: General schema of the Witty-Home system.
Figure 1: General schema of the Witty-Home system.
In one way, if it is connected to the internet, Witty Home charging station sends usage data (such as energy consumption during charging session or station current state) and TIC data (house consumption), only if the end-user gave his consent as explained in the Authorize-TIC section. These data can be accessed through Charging station and Grid meter Witty-Home APIs routes.
In the other way, the charging station can receive a set of commands triggered by the user by calling operators in the Witty-Home APIs routes. For example the end-user can start or stop a charging session.
The Witty-Home system sends notifications when events (a cable is plugged or unplugged for example) or errors (such as too many load shedding during a charging station) occur on the charging station. The subscription / unsubscription processes and available notifications types are detailed in the Notification section.
The developer portal is a website provided by Hager for our partners, they can create an account that allow them to access to the API documentation and test them from the portal.
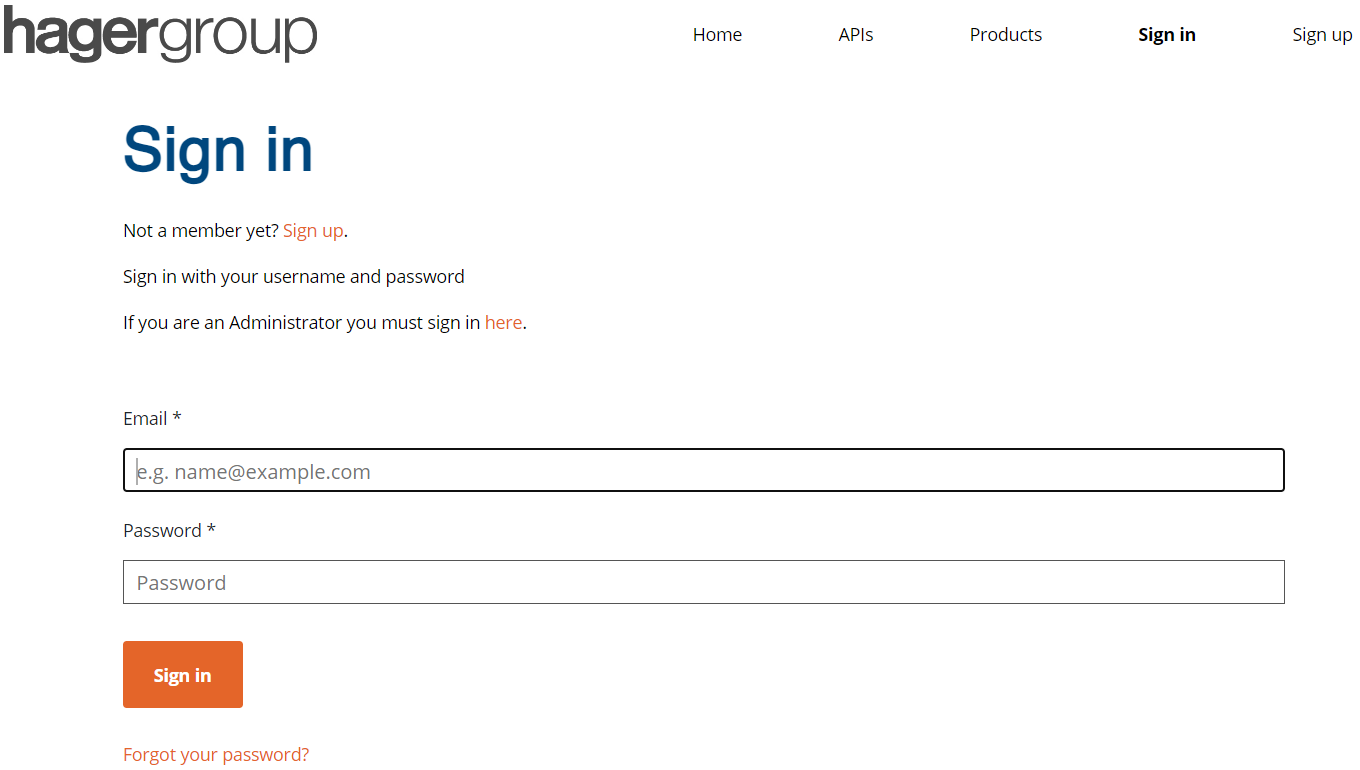
Figure 2: Create an account in Hager Developer portal.
As soon as the account is created, one received a confirmation mail.
The partner can access the list of products by clicking on the “Products” link in the menu bar.
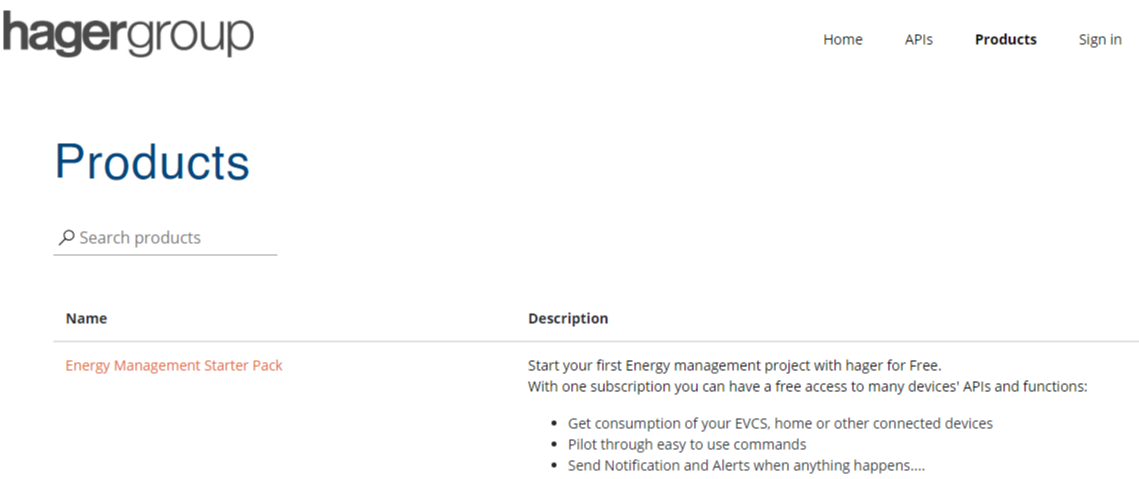
Figure 3: Get the list of Hager APIs one can subscribe.
To start with Witty Home API, select the Energy Management Starter Pack.
A subscription associated to the account is then created. The so-created subscription can be renamed.
The user will be notified by email as soon as the subscription request to the product is approved by the administrator.
Once the subscription is accepted one can access the Witty Home API.
The API key can now be recovered from the profile, by clicking on the username in the top right corner.
We will describe here how to use Witty-Home system main functionalities.
To be able to use any Witty-Home system functionality you need:
The first step is to create an installation dedicated to your Witty-Home system if you don’t already have one. An installation is the central point to manage your system devices. A user can see all his installations by calling the Get all user installations route.
To create a Witty-Home installation call the Installation creation route. Once the installation created, you will need to associate the charging station to this installation.
The next step after the installation creation is the association of the charging station to the installation. To do that you will need the unique id (uid) of your device or the value embedded in the QR code, both are available on the charging station packaging. With one of these two information call the device association route.
Once the charging station associated, you should define your TIC consent to authorize or not TIC data transmission. This can be done by calling the Authorize-TIC route. TIC data are your house consumption. (more detail in the Grid meter section).
Then if you gave your consent for TIC data transmission, you should define your electrical tariffs in order to have more realistic comsuption costs statistics. Witty-Home system automatically detects your subscription type to only ask you the corresponding prices. If you did not give your consent, default tariffs will be applied for consumption costs calculation (more details in the Tariffs management section).
To optimize the charging costs, Witty-Home offers 3 differents charging mode :
immediate: when you plug an electrical vehicule (EV) it starts charging immediately,deferred: when you plug an EV it will start charging only when you will be on a low price tariff, but if it’s already started on a low price tariff, the charge will continue and finish even if you switch on a high price tariff,deferred exclusive: this mode works as the deferred one but will stop a charging session if you switch on a high price tariff. It only charge on low price tariff exclusively.To set the charge mode of your charging station call the Set charge mode route. This route is asynchronous and will return a 202 Accepted response to indicate that the command was sent to the charging station and will be processed by the device.
Remark: All sockets of the charging station must be available (unplugged) to change the charge mode. You can’t modify it if a car is plugged.
If you are not in immediate charge mode, and plugged a car into the charging station, you can request the device to start a charging session. To do that call the Start session route. This route is asynchronous and will return a 202 Accepted response to indicate that the command was sent to the charging station and will be processed by the device.
If you are not in immediate charge mode and a car is plugged into the charging station, you can request the station to stop charging the car. To do so call the Stop session route. This route is asynchronous and will return a 202 Accepted response to indicate that the command was sent to the charging station and will be processed by the device.
In this section we will describe all the APIs routes and their usage. Witty-Home APIs expose 3 types of ressources:
An installation is the central point of each Hager product type on which you associate your devices. For exemple, on a Witty-Home installation you can add only a Witty charging station whereas on an EOne (Alarm product) installation you can add several security devices as motion or smoke detectors and a security controller. In Witty-Home APIs, an installation is represented by the model shown below in an example:
{
  "installationId": 33,
  "externalId": "XEVFR-myBoxSerialNumber",
  "applicationCode": "flowEvcs",
  "name": "Mon installation Witty-Home",
  "locationName": "Bordeaux",
  "locationGpsCoordinates": {
    "latitude": 44.8,
    "longitude": -0.6
  }
}
Let’s explain each field:
installationId is the installation numeric identifier,externalId is the identifier of your charging station if it has been associated with your installation (see the Onboarding section). If you did not already associate your device, this field is null.applicationCode is the installation product type (flowEvcs for Witty-Home product),name is the custom name you can give to the installation at its creation,locationName is the city name where the installation is located,locationGpsCoordinates are the GPS coordinates of the installation location.You can get the list of your user account installations by calling this route:
GET /installations
It returns an array of the user account Witty installations
Witty-Home APIs permits you to create your own installation for a Witty-Home product by calling the following route:
POST /installations
This route takes as payload some mandatory installation data as follow:
{
  "name": "Mon installation Witty-Home",
  "locationName": "Bordeaux",
  "locationGpsCoordinates": {
    "latitude": 44.8,
    "longitude": -0.6
  }
}
It returns a 201 Created response with the new installation data.
As explained in the overview introduction, Witty-Home system offers the possibility to receive notifications when events or errors occur on your charging station. These notifications can be sent through a webhook to an endpoint in your own information system.
To get the list of existing notifications subscriptions on your installation call the following route: GET /installations/{installationId}/event-subscriptions
where {installationId} is the installation identifier.
This route returns an array of event subscriptions and permits you to retreive their identifier to be able to call individual routes. An event subscription is defined by the following model:
{
  "eventSubscriptionId": "bca8d470-ac0b-666b-b986-fb38344db84a",
  "installationId": 33,
  "userId": "123456e6-1234-4c80-ad73-7c445d23f500",
  "protocolCode": "webhook",
  "protocolData": "https://mywebhookendpointurl",
  "filter": {
    "subjectBeginsWith": "",
    "subjectEndsWith": ""
  },
  "state": "Created",
  "creationDate": "2020-11-06T15:31:30Z",
  "modificationDate": "0001-01-01T00:00:00Z"
}
where
protocolCode is the type of endpoint the subscription point to, only webhook are implemented for now,protocolData is your webhook endpoint urlTo get a single event subscription, you can call this route:
GET /installations/{installationId}/event-subscriptions/{eventSubscriptionId}
where {eventSubscriptionId} is the event subscription identifier.
To subscribe and receive notifications on a webhook, call the following route:
POST /installations/{installationId}/event-subscriptions
where {installationId} is the installation identifier.
This route requires the following payload:
{
  "protocolCode": "Webhook",
  "protocolData": "https://mywebhookendpointurl",
  "eventType": "string",
}
protocolCode is the type of endpoint the subscription point to, only “Webhook” are implemented for now,
protocolData is your webhook endpoint url
eventType is an optional filter that you can use to receive notifications of a single event type, its value must be one one the following available types:
XEFVR.state_EVCS_session: this will notify you of charging sessions start and end,XEVFR.state_EVCS_socketState: notifies of every socket state change [0 = Available | 1 = Occupied | 2 = Charging | 3 = In trouble]XEVFR.state_EVCS_error: triggered for system errors of this list [ NoError = 0 | M3CableFailure = 1 | M3CpShortCircuitFailure = 2 | CarOverconsumption = 3 | M3VentilationError = 4 | LoadSheddingFailure = 5 | M3CpFailure = 6 | SixmADetection = 9 | M3FatalErrorWeldedContact1 = 130 | FatalErrorDcSensor6mA = 133 | Offline = 400]XEVFR.state_EVCS_chargeMode: event sent at every charge mode modification, it contains the new charge mode,XEVFR.state_EVCS_cybersecurity: this notifies you of any network access and settings update of the wifi or ethernet access point of your charging station [0 = AP login success | 1 = AP login failure | 2 = AP password changed or reset to factory | 3 = Wi-Fi SSID changed | 4 = Network configuration changed]To unsubscribe to notifications, two routes are available.
To delete all your account subscriptions in one call:
DELETE /installations/{installationId}/event-subscriptions
where {installationId} is the installation identifier.
To delete a specific subscription with its identifier:
DELETE /installations/{installationId}/event-subscriptions/{eventSubscriptionId}
where {installationId} is the installation identifier and {eventSubscriptionId} the identifier of the subscription to delete. To get the subscription identifier call the Get subscriptions route.
Witty-Home system allows you to share your installation with your installer to permit him to monitor your charging station. He will only see general data and will not be able to call commands such as starting or stopping charges neither see your charging station and grid meter costs or consumptions.
To share your installation you must send an email invitation to your installer by calling this route:
POST /installations/{installationId}/invitations
where {installationId} is the installation identifier.
This route requires the following payload:
{
  "email": "myinstaller@example.com",
  "cultureCode": "fr-FR"
}
email is your installer email address,cultureCode is the code of the language in which the invitation email will be sent. It must be one of [en-GB | fr-FR | de-DE].It returns a 201 Created response with the new invitation data.
To check the status of your pending invitation call:
GET /installations/{installationId}/invitations
where {installationId} is the installation identifier.
This will return an invitationStatus formatted as follow:
{
  "email": "myinstaller@example.com",
  "installationName": "my Home charging station",
  "installationId": 33,
  "expirationDate": "2022-10-17T15:56:00Z"
}If you want to cancel a pending invitation, you can delete it with this route:
DELETE /installations/{installationId}/invitations/{email}
where
{installationId} is the installation identifier,{email} is the email address of the installer who received the invitation.It returns a 204 NoContent response when deletion is done.
To accept an invitation, an installer can call this route:
POST /invitations/operators/accept/{activationCode}
where {activationCode} is the activation code received in the invitation email.
It returns a 200 OK response when the invitation is successfully accepted.
/!\This route only works with an installer account !
To get a list of all users existing on your installation, use this route:
GET /installations/{installationId}/users
where {installationId} is the installation identifier.
The return will be an array of UserModel matching the following model:
[
  {
    "accountId": "string",
    "accountFirstName": "string",
    "accountLastName": "string",
    "accountEmail": "string",
    "authorizationGroups": [
      "ownerActive"
    ],
    "roleCode": "owner",
    "enabled": true
  }
]
authorizationGroups is an array of user authorizations. It can be [installerActive | installerInactive | ownerActive],roleCode is one of [owner | installer].If you want to temporarily stop sharing your installation with your installer you can disable him. He will not be able to access your data until you enable him again.
POST /installations/{installationId}/users/{accountId}/operators/disable
where
{installationId} is the installation identifier,{accountId} is the installer user identifier that you can get with the Get Users route.It returns a 204 NoContent response when the installer is disable.
When you disabled your installer and want to allow him to monitor your installation again call this route to enable him:
POST /installations/{installationId}/users/{accountId}/operators/enable
where
{installationId} is the installation identifier,{accountId} is the installer user identifier that you can get with the Get Users route.It returns a 204 NoContent response when the installer is enabled.
To definitively stop sharing your installation with an installer, you can remove it from your installation with this route:
DELETE /installations/{installationId}/users/{accountId}
where
{installationId} is the installation identifier,{accountId} is the installer user identifier that you can get with the Get Users route.It returns a 204 NoContent response when the installer is deleted.
Main functionalities of Witty-Home system permit you to check your charging station current state and configuration, interact with it through some asynchronous commands to optimize your charging sessions and retrieve statistics about your electric consumption as well of your charging session or your whole house (if you gave your consent for TIC data transmission).
In Witty-Home APIs, the charging station is described by the following model:
{
  "id": "60e0d33e-cd45-4382-9e4d-c64002c3f5a7",
  "serialNumber": "1234ABCDEF5678",
  "uuid": "SyybhpX7Lzo3uhTzCoWQbn",
  "installationParentId": 33,
  "type": "chargingStation",
  "properties": {
    "installationDate": "2020-04-15T13:28:13Z",
    "productionDate": "2020-04-07T13:27:25Z",
    "productReference": "XEVFR",
    "macAddress": "F8-F5-05-DC-33-83",
    "wifiSsid": "myInternetBox-ABCD",
    "friendlyName": "my garage charging station",
    "phaseNumber": "threePhase",
    "erlConnected": true,
    "ticConnected": "connected",
    "nightModeConnected": "dn",
    "sheddingMode": "chpLoadShedding7A13A",
    "averageEvConsumption": "14.2",
    "isDefaultAverageEvConsumption": false,
    "tariff1": "hc",
    "tariff2": "hp",
    "tariff3": "hc",
    "tariff4": "hc",
    "tariff5": "hp",
    "tariff6": "hc",
    "tariff7": "hp",
    "tariff8": "hc",
    "tariff9": "hp",
    "tariff10": "hc",
    "authorizeTic": "consent",
    "availability": "occupied",
    "chargeMode": "immediate",
    "carPlugStatus": "m3",
    "keySwitch": "locked",
    "timezone": "Romance Standard Time",
    "culture": "fr-fr",
    "connectivityType": "ethernet",
    "evcsLocked": true,
    "error": {
      "code": 0
    },
    "currentSession": {
      "startDate": "2020-11-09T10:50:11Z",
      "duration": "03:33",
      "totalSessionEnergy": 99.0,
      "totalSessionCost": 0.915,
      "chargingSpeed": "optimal",
      "chargingDuration": "03:15",
      "rangeRecoveredByEV": 697
    },
    "lastSession": {
      "startDate": "2020-09-03T13:59:50Z",
      "endDate": "2020-09-03T14:01:16Z",
      "sessionDuration": "00:30",
      "chargingDuration": "00:15",
      "totalSessionEnergy": 38,
      "totalSessionCost": 0.422,
      "rangeRecoveredByEV": 267
    },
    "heartbeat": {
      "heartbeat": true,
      "receptionDate": "2020-11-09T10:50:11Z"
    }
  }
}
Let’s explain each charging station field:
id is the station identifier in Witty-Home system and must be used for charging station individual APIs routes,serialNumber is your device serial number,uuid is the charging station device unique identifier for Hager platform,installationParentId is your installation identifier with which the station is asociated,type which value is chargingStation reminds the type of device which is displayed,properties is a dictionnary of charging station specific fields:
installationDate reminds the date of the association between the station and your installation,productionDate is the manufacturing date of your device,productReference for Witty-Home charging station the value must be XEVFR,macAddress is the mac address of the on board wifi card,wifiSsid reminds the wifi network SSID to which the station is connected,friendlyName a custom friendly name you can set on your charging station,phaseNumber indicates if the station is plugged to a single or three phase electrical installation,erlConnected true if an “Emmeteur Radio Linky” (a wifi transmitter) is connected to your Linky,ticConnected is one of Error | Connected | NotConnected, it indicates if a wired TIC connection is successfully established with your house electrical board,nightModeConnected is the day/night switch mode,sheddingMode corresponds to the load shedding mode (to ensure that the station is not consuming too much power of your house installation versus your own electrical usage in the rest of the house to avoid reaching your maximum subscribed power),averageEvConsumption is the average energy consumption of your electrical vehicle, it’s used to calculate the range you recovered during a charging session. You can set a custom value or use the system default value,isDefaultAverageEvConsumption indicates whether you set a custom value to the averageEvConsumption parameter or you are using the system default value,tariff1 to tariff10 are only used when you TIC is in Standard mode (more details about TIC modes in TIC types section) it indicates whether this tariff is a low price tariff hc or a high price tariff hp,authorizeTic indicates if you gave your consent for TIC data transmission,availability describes the state of the M3 plug of your charging station, its values can be one of [Available = 0 | Occupied = 1 | Charging = 2 | InTrouble = 3],chargeMode displays the curreny charge mode of your station (see How to change charge mode section),carPlugStatus indicates which plugs are occupied on your station. It can be one of [M2 = only M2 is plugged | M3 = only M3 is plugged | M2M3 = both are plugged],keySwitch is the state of the physical key lock on your device,timezone is your current timezone, it’s one of [GMT Standard Time | Romance Standard Time | W. Europe Standard Time],culture is your current culture, it’s one of [en-gb | fr-fr | de-de] and is used for the language of notification emails,connectivityType defines the type of com board on your charging station, it’s one of [Wifi | Ethernet],evcsLocked indicates whether the chargingstation is locked or not, depending of the keySwitch position and the AccessControl mode set by your installer (StandAloneHome or KeySwitch),error store the last error that occured on your system. The code value is one of [ NoError = 0 | M3CableFailure = 1 | M3CpShortCircuitFailure = 2 | CarOverconsumption = 3 | M3VentilationError = 4 | LoadSheddingFailure = 5 | M3CpFailure = 6 | SixmADetection = 9 | M3FatalErrorWeldedContact1 = 130 | FatalErrorDcSensor6mA = 133 | Offline = 400],currentSession contains informations of the current charging session (session duration, charging duration, energy, cost and speed, range recovered by your electrical vehicle with the energy of the session),lastSession reminds information of the last charging session,heartbeat contains the reception date of the last heartbeat message received from your device. It’s normally sent every 10 minutes to notify that your charging station internet connection and its system are operational.Witty-Home APIs exposes synchronous routes to get, add and remove a charging station from an installation and asynchronous routes to send commands to your device.
To get the list of charging station available on an installation (usually one), call the route:
GET /installations/{installationId}/charging-stations
where {installationId} is the installation identifier.
This route returns an array of charging stations and permits you to retreive their identifier to be able to call individual routes.
You can get the detail of a specific charging station with its identifier by calling this route:
GET /installations/{installationId}/charging-stations/{chargingStationId}
where
{installationId} is the installation identifier{chargingStationId} is the charging station identifierThis route returns the detail of a specific charging station.
To associate a charging station to your installation call the following route:
POST /installations/{installationId}/charging-stations
where {installationId} is the installation identifier.
This route requires the following payload:
{
  "uid": "Fbo5WTTsSeeLQ8YYoLzNwN",
  "qrCode": "https://hgr.io/u/Fbo5WTTsSeeLQ8YYoLzNwN",
  "timezone": "Romance Standard Time",
  "country": "fr-fr"
}
You must pass at leat one of the two parameters uid or qrCode. The uid and QR code can be found on the charging station packaging.
The timezone must be one of [GMT Standard Time | Romance Standard Time | W. Europe Standard Time].
The country must be one of [en-gb | fr-fr | de-de].
The route returns a 201 Created response with the newly added charging station information as response value.
To remove a charging station from your installation call the following route:
DELETE /installations/{installationId}/charging-stations/{chargingStationId}
where
{installationId} is the installation identifier{chargingStationId} is the charging station identifierIt returns a 204 No Content response when the dissociation is successful.
To modify the charge mode of your station call the following route with the desired mode:
POST /installations/{installationId}/charging-stations/{chargingStationId}/operators/set-charge-mode
where
{installationId} is the installation identifier{chargingStationId} is the charging station identifierThis route takes the following payload as input:
{
  "chargeMode": "immediate"
}
The charge mode must be one of ["immediate" | "deferred" | "deferredExclusive"]
See How to set the charge mode of the charging station section for explainations of each mode.
To start a charging session if your car is plugged and your station is not in immediate mode (otherwise it will automatically start when you plug the car) call this route:
POST /installations/{installationId}/charging-stations/{chargingStationId}/operators/start
where
{installationId} is the installation identifier{chargingStationId} is the charging station identifierThis route returns a 202 Accepted response to confirm that the command was sent to the charging station and will be processed by the device.
To stop a charging session, call the following route:
POST /installations/{installationId}/charging-stations/{chargingStationId}/operators/stop
where
{installationId} is the installation identifier{chargingStationId} is the charging station identifierThis route returns a 202 Accepted response to confirm that the command was sent to the charging station and will be processed by the device.
You can update few properties of your charging station by calling this route:
PUT /installations/{installationId}/charging-stations/{chargingStationId}
where
{installationId} is the installation identifier{chargingStationId} is the charging station identifierThis route takes the following payload as input:
{
  "friendlyName": "my borne",
  "ledPower": 30,
  "averageEvConsumption": 37.5,
  "tariff1": "hp",
  "tariff2": "hc",
  "tariff3": "hp",
  "tariff4": "hp",
  "tariff5": "hc",
  "tariff6": "hp",
  "tariff7": "hp",
  "tariff8": "hp",
  "tariff9": "hp",
  "tariff10": "hp"
}
friendlyName is a custom name you can give to your charging station to easily identify it,ledPower must be a value between 30 and 100 (% of intensity), it adjusts the brightness of the charging station front LED,averageEvConsumption is the average energy in kWh used by your electrical vehicle for 100 kms,tariff1 to tariff10 permits to define which custom tariff of your standard subscription is a high cost (hp) or a low cost (hc) tariff.All fields are optional you can only provide the one you need to update.
Remark: All sockets of the charging station must be available (unplugged) to change ledPower or one of the tariffX parameters. You can’t modify them if a car is plugged as it will need your charging station to reboot to apply the update.
This route returns a 202 Accepted response to confirm that the command was sent to the charging station and will be processed by the device.
A measure is the recording of a metric data on a time basis. A metric is a value on which an aggregation operation (sum, average, count, min-max) can be done. Measures metadata are defined by the following model:
{
  "measureId": "1",
  "name": "EnergyConsumption",
  "type": "Energy",
  "unit": "kWh",
  "periodicity": "10m"
}To get the metadata of all available measures of a charging station, call the route:
GET /installations/{installationId}/charging-stations/{chargingStationId}/measures
where
{installationId} is the installation identifier{chargingStationId} is the charging station identifierThis route returns an array of charging station measures and permits you to retreive their identifier to be able to call individual routes.
To get the metadata of a specific measure, call the route:
GET /installations/{installationId}/charging-stations/{chargingStationId}/measures/{measureId}
where
{installationId} is the installation identifier{chargingStationId} is the charging station identifier{measureId} is the measure identifierThis route returns the metadata of a specific measure.
You can aggregate measure values by calling the ‘operators’ routes:
POST /installations/{installationId}/charging-stations/{chargingStationId}/measures/{measureId}/operators/sum
POST /installations/{installationId}/charging-stations/{chargingStationId}/measures/{measureId}/operators/count
POST /installations/{installationId}/charging-stations/{chargingStationId}/measures/{measureId}/operators/average
POST /installations/{installationId}/charging-stations/{chargingStationId}/measures/{measureId}/operators/min-max
where
{installationId} is the installation identifier{chargingStationId} is the charging station identifier{measureId} is the measure identifierThese routes take the aggregation parameters as payload formatted as follow:
{
  "startDate": "2020-06-02T00:58:24.458Z",
  "endDate": "2020-06-04T12:15:33.458Z",
  "step": "day"
}
startDate is the beginning of your search period formatted as an UTC dateendDate is the end of your search period formatted as an UTC datestep is the aggregation level, it’a an enumeration and can be one of: [hour | day | week | month | year]The result values are grouped by date and tariff type (HC: low tariff or HP: high tariff). Here is an example of the result with a TEMPO subscription for a search over a day with a step hour:
[
  {
    "date": "2020-06-29T00:00:00.000Z",
    "tariffType": "hp",
    "value": 6,
    "valueHpjb": 3,
    "valueHpjw": 2,
    "valueHpjr": 1
  },
  {
    "date": "2020-06-29T08:00:00.000Z",
    "tariffType": "hc",
    "value": 15,
    "valueHcjb": 4,
    "valueHcjw": 5,
    "valueHcjr": 6
  }
]
In the result array, for each couple date and tariffType you will find:
date: the UTC date of the result,tariffType: the type of tariffs in the group, it’s one of [hc | hp]. hc is for a group of low price tariffs (heure creuse) and hp is for a group of high price tariffs (heure pleine),value: is the sum of all tariffs values,valueHpjb | valueHpjw | valueHpjr | valueHcjb | valueHcjw | valueHcjr: for each tariff you will find a ValueXXX property which contains the requested aggregation for the specific tariff. In this example you can only see TEMPO subscription tariffs names but obviously there can be a ValueXXX for any of all tariffs described in Subscriptions and tariffs section (for example ValueHc, ValueHp and so on…).valueMin: not in this example but if you use a min-max aggregation operator, this property will contain the minimal value,valueMax: not in this example but if you use a min-max aggregation operator, this property will contain the maximal value.Here is the model with the exhaustive list of properties. You will never get all of them as you will only see the tariff values matching your subscription, its purpose is just to show all existing fields:
[
  {
    "date": "2020-06-29T15:38:45.329Z",
    "value": 0,
    "valueMin": 0,
    "valueMax": 0,
    "tariffType": "hp",
    "valueTh": 0,
    "valueHc": 0,
    "valueHp": 0,
    "valueHn": 0,
    "valuePm": 0,
    "valueHcjb": 0,
    "valueHpjb": 0,
    "valueHcjw": 0,
    "valueHpjw": 0,
    "valueHcjr": 0,
    "valueHpjr": 0,
    "valueTariff1": 0,
    "valueTariff2": 0,
    "valueTariff3": 0,
    "valueTariff4": 0,
    "valueTariff5": 0,
    "valueTariff6": 0,
    "valueTariff7": 0,
    "valueTariff8": 0,
    "valueTariff9": 0,
    "valueTariff10": 0
  }
]A log is the recording of a non-metric data on a time basis. A non-metric is a value on which aggregation operations (sum, average, …) cannot be done. Logs are defined by the following metadata:
[
  {
    "logId": "1",
    "name": "SessionStart",
    "periodicity": "Immediate"
  }
]To get the metadata of all available logs for a charging station, call the route:
GET /installations/{installationId}/charging-stations/{chargingStationId}/logs
where
{installationId} is the installation identifier{chargingStationId} is the charging station identifierThis route returns an array of charging station logs and permits you to retreive their identifier to be able to call individual routes.
To get the metadata of a specific log, call the route:
GET /installations/{installationId}/charging-stations/{chargingStationId}/logs/{logId}
where
{installationId} is the installation identifier{chargingStationId} is the charging station identifier{logId} is the log identifierThis route returns the metadata of a specific log.
The only operators available on a log are count and list as logs are non-metric data. To count a log values call this route: POST /installations/{installationId}/charging-stations/{chargingStationId}/logs/{logId}/operators/count
where
{installationId} is the installation identifier{chargingStationId} is the charging station identifier{logId} is the log identifierThis route takes the count aggregation parameters as payload formatted as follow:
{
  "startDate": "2020-06-02T00:58:24.458Z",
  "endDate": "2020-06-04T12:15:33.458Z",
  "step": "day"
}
startDate is the beginning of your search period formatted as an UTC dateendDate is the end of your search period formatted as an UTC datestep is the aggregation level for the count, it’a an enumeration and can be one of: [hour | day | week | month | year]The result values are grouped by date. Here is an example of a count by day of SessionStart log (logId = 1):
[
  {
    "date": "2020-04-16T00:00:00Z",
    "value": 5.0,
    "logName": "SessionStart"
  },
  {
    "date": "2020-04-20T00:00:00Z",
    "value": 4.0,
    "logName": "SessionStart"
  }
]
date is the UTC date of the result groupvalue is the count value for the datelogName is a reminder of the log name matching the log id given as input parametersTo get the history of a specific log values, call this route: POST /installations/{installationId}/charging-stations/{chargingStationId}/logs/{logId}/operators/list
where
{installationId} is the installation identifier{chargingStationId} is the charging station identifier{logId} is the log identifierThis route takes the search span parameters as payload formatted as follow:
{
  "startDate": "2020-06-02T00:58:24.458Z",
  "endDate": "2020-06-04T12:15:33.458Z"
}
startDate is the beginning of your search period formatted as an UTC dateendDate is the end of your search period formatted as an UTC dateThis route returns the full history of the given log for the search span.
Here is an example of a StartSession log search:
[{
  "date": "2020-09-03T13:58:08Z",
  "value": {
    "evcsSocket": "m3",
    "evcsCableValue": 32
  },
  "logName": "SessionStart"
}, {
  "date": "2020-09-03T13:59:50Z",
  "value": {
    "evcsSocket": "m3",
    "evcsCableValue": 32
  },
  "logName": "SessionStart"
}, {
  "date": "2020-11-09T10:50:11Z",
  "value": {
    "evcsSocket": "m3",
    "evcsCableValue": 32
  },
  "logName": "SessionStart"
}]
date is the UTC date of the result groupvalue is the full value of the log record, here an object with the session data (evcsSocket is the kind of plug used for the session and evcsCableValue is the cable maximum supported intensity)logName is a reminder of the log name matching the log id given as input parametersTo get the history of all logs values in one request, call the following route. As there is no filter by log id, there can be a lot of results. We recommand you to narrow the time range of your search.
POST /installations/{installationId}/charging-stations/{chargingStationId}/logs/operators/list
where
{installationId} is the installation identifier{chargingStationId} is the charging station identifierThis route takes the search span parameters as payload formatted as follow:
{
  "startDate": "2020-06-02T00:58:24.458Z",
  "endDate": "2020-06-04T12:15:33.458Z"
}
startDate is the beginning of your search period formatted as an UTC dateendDate is the end of your search period formatted as an UTC dateThe result is an array of all logs values over your search range whatever their type. Here is an example:
[{
  "date": "2020-09-03T13:58:08Z",
  "value": {
    "keySwitch": "unlocked"
  },
  "logName": "KeySwitch"
}, {
  "date": "2020-09-03T13:58:08Z",
  "value": {
    "evcsSocket": "m3",
    "evcsCableValue": 32
  },
  "logName": "SessionStart"
}, {
  "date": "2020-09-03T13:58:08Z",
  "value": {
    "chargeMode": "deferredExclusive"
  },
  "logName": "ChargeMode"
}, {
  "date": "2020-09-03T13:58:08Z",
  "value": {
    "code": "noError",
    "state": false
  },
  "logName": "Errors"
}, {
  "date": "2020-09-03T13:58:08Z",
  "value": {
    "event": 3.0,
    "timestamp": "2020-09-03T13:58:08Z",
    "message": "MyNewSSID"
  },
  "logName": "CyberSecurity"
}, {
  "date": "2020-09-03T13:59:02Z",
  "value": {
    "chargingDuration": 900,
    "sessionDuration": 1800,
    "cost": 0.0035999999999999995,
    "energy": 24.0
  },
  "logName": "SessionEnd"
}]
Details of error codes and cybersecurity events codes are available in the Notifications section.
For charge modes details see How to change charge mode.
First of all, let’s describe what is a grid meter in the french context.
The grid meter is the central point of a house electrical installation. It permanently measures and surveys the electrical consumption. It breaks the current if consumption reaches the installation material limits (the maximum current intensity in Ampere it can support) or the provider subscription limits (the maximum intensity subscribed by the contract with the provider : for example a 6 kVA contract allows a maximum consumption of 30 A). The grid meter is also a smart device: it can transmit data to other devices throught a wired connection called the TIC (télé-information client) or for the more recent Linky device by wireless connection with en ERL (Emetteur Radio Linky).
Once you associated your charging station with your installation and if you gave your consent for the TIC transmission (see Authorize-TIC route to know how to set the TIC consent), you will be able to access your house data. We will see more details about these data below.
This section presents a detailed description of all grid meter properties, essentially coming from TIC data.
In Witty-Home APIs, the grid meter is represented by the model shown below in an example:
{
  "id": "a6536308-fc1d-4930-ae1a-19a526958c75",
  "installationParentId": 42,
  "type": "gridMeter",
  "properties": {
    "generalConsumption": {
      "consumptionTotalIndex": 652,
      "consumptions": [
        {
          "name": "HC",
          "value": 304
        },
        {
          "name": "HP",
          "value": 348
        }
      ]
    },
    "ticType": 5,
    "intensitySubscribed": 60,
    "currentTariff": "HC",
    "gridSubscription": "HCHP"
  }
}
Let’s explain each field:
id is the grid meter identifier formatted as a GUID,installationParentId is the identifier of the installation to which the grid meter is associated,type is the type of device, here a “gridMeter”. It’s an enumeration whose values can be one of [chargingStation|gridMeter],Properties is a dictionary of grid meter specific fields:
generalConsumption represents an overview of the house consumption, it contains:
consumptionTotalIndex which is the sum of all the house consumption indexes (in Wh),consumptions which is an array of individual tariffs index with the tariff name and its index value (in Wh),ticType which is the type of TIC your grid meter is running. It’s an enumeration whose values can be one of [Error = 0 | Idle = 1 | GreenCharging = 2 | StandardMono = 3 | StandardTri = 4 | HistoricMono = 5 | HistoricTri = 6] (we will explain each TIC type below).intensitySubscribed is the maximum intensity defined by your provider subscription (in Ampere). For example a 6 kVA subscription corresponds to a subscribed intensity of 30 A.currentTariff is the currently active tariff of your subscription. For example if you have a HCHP contract you will have a off-peak hour tariff called ‘HC’ (usually during the night) and a pick hour tariff called ‘HP’ (usually during the day) that will appear in that field.gridSubscription is the name of your provider subscription. Following the ‘currentTariff’ example, it would be ‘HCHP’ (we will explain subscriptions below)In this section we will explain different TIC types values:
Error: a hardware issue is present, the TIC signal received by the charging station is invalid,Idle: the TIC signal is sent only with the meter serial number but no index,GreenCharging: it’s an historic TIC simulated by XEV304 Hager TIC simulator product,StandardMono: means that your grid meter is plugged to a single phase and running in standard TIC mode. Standard mode permits to manage 10 custom tariffs named from Tariff1 to Tariff10. It’s used when you left the historical provider EDF. In this mode, your alternative provider can configure up to 10 tariffs with low or high prices.StandardTri: it’s also a Standard TIC mode as described above but with a grid meter plugged on 3 phases,HistoricMono: it represents an Historic TIC mode for a single phase plugged grid meter. The Historic mode only manages EDF specific tariffs and subscriptions (for example HC/HP). (we will describe them in the next section below),HistoricTri: this is also an Historic TIC mode as described above (EDF specific) but with a grid meter plugged on 3 phases.To summarize, an Historic TIC is a specific format for EDF (Electricité de France) tariffs and subscriptions whereas Standard TIC is a set of 10 custom tariffs.
As we explained in the previous section, there will be 2 types of subscriptions and each subscription has its specific tariffs.
On the one hand, there are EDF subscriptions, which imply that your grid meter runs in Historic TIC mode. Let’s describe each EDF subscription and its associated tariffs:
BASE: the simpliest contract with a single tariff named TH (‘toutes heures’: same price for all hours),HCHP: the most widespread subscription (HeureCreuseHeurePleine) with 2 tariffs:
HC: a low price off peak-hour tariff (heures creuses),HP: a full price peak-hour tariff (heures pleines),EJP: this contract (EffacementJourdePointe) defines 2 tariffs:
HN: a low price off peak-day tariff (heures normales), available 343 days a year,PM: a high price peak-days tariff (pointe mobile) on the 22 remaining days of the year between the 1st of november and the 31th of june,TEMPO: this subscription offers 6 tariffs: 3 day colours (blue, white and red from the lower price to higher price) and for each colour a HC tariff and a HP tariff:
HCJB: a low price off peak-hour tariff for blue days, the lower price (heures creuses jours bleus),HPJB: a full price peak-hour tariff for blue days (heures pleines jours bleus),HCJW: a low price off peak-hour tariff for white days (heures creuses jours white),HPJW: a full price peak-hour tariff for white days (heures pleines jours white),HCJR: a low price off peak-hour tariff for red days (heures creuses jours rouges),HPJR: a full price peak-hour tariff for red days, the higher price (heures pleines jours rouges).On the other hand, there are all other subscriptions of alternative providers. For all these providers your grid meter runs in Standard TIC mode. This mode permits alternative providers to set up to 10 tariffs with low or high prices. In this case, Witty system consolidates all alternative contracts to one STANDARD subscription which exposes these 10 customizable tariffs:
Tariff1,Tariff2,Tariff3,Tariff4,Tariff5,Tariff6,Tariff7,Tariff8,Tariff9,Tariff10.To get the list of grid meters available on an installation (usually one), call the route:
GET /installations/{installationId}/grid-meters
where {installationId} is the installation identifier.
This route returns an array of grid meters and permits you to retreive their identifier to be able to call individual routes.
You can get the detail of a specific grid meter with its identifier by calling this route:
GET /installations/{installationId}/grid-meters/{gridMeterId}
where
{installationId} is the installation identifier{gridMeterId} is the grid meter identifierThis route returns the detail of a specific grid meter.
To set your consent and authorize or not the transmission of your TIC data to Hager’s system, call the following route:
POST /installations/{installationId}/grid-meters/{gridMeterId}/operators/authorize-tic
where
{installationId} is the installation identifier{gridMeterId} is the grid meter identifierThis route takes as payload an object with a unique property authorizeTIC. You must set it to:
true if you want to give your consent and accept that your TIC are transmitted to Hager’s system.
It’s mandatory if you want to access grid meter routes, to be able to follow your house consumption statistics and mostly benefit of the consumption cost optimisation system of your charging station (charging session can be automatically started when you enter low prices tariffs period, which can only be detected with TIC data),
false if you don’t want to send your TIC data and don’t want to benefit of optimized charging session management neither.
As for charging station, a measure is the recording of a metric data on a time basis. A metric is a value on which an aggregation operation (sum, average, count, min-max) can be done. Measures metadata are defined by the following model:
{
  "measureId": "1",
  "name": "EnergyConsumption",
  "type": "Energy",
  "unit": "kWh",
  "periodicity": "10m"
}To get the metadata of all available measures of a grid meter, call the route:
GET /installations/{installationId}/grid-meters/{gridMeterId}/measures
where
{installationId} is the installation identifier{gridMeterId} is the grid meter identifierThis route returns an array of grid meter measures and permits you to retreive their identifier to be able to call individual routes.
To get the metadata of a specific measure, call the route:
GET /installations/{installationId}/grid-meters/{gridMeterId}/measures/{measureId}
where
{installationId} is the installation identifier{gridMeterId} is the grid meter identifier{measureId} is the measure identifierThis route returns the metadata of a specific measure.
You can aggregate measure values by calling the ‘operators’ routes:
POST /installations/{installationId}/grid-meters/{gridMeterId}/measures/{measureId}/operators/sum
POST /installations/{installationId}/grid-meters/{gridMeterId}/measures/{measureId}/operators/count
POST /installations/{installationId}/grid-meters/{gridMeterId}/measures/{measureId}/operators/average
POST /installations/{installationId}/grid-meters/{gridMeterId}/measures/{measureId}/operators/min-max
where
{installationId} is the installation identifier{gridMeterId} is the grid meter identifier{measureId} is the measure identifierThese routes take the aggregation parameters as payload formatted as follow:
{
  "startDate": "2020-06-02T00:58:24.458Z",
  "endDate": "2020-06-04T12:15:33.458Z",
  "step": "day"
}
startDate is the beginning of your search period formatted as an UTC dateendDate is the end of your search period formatted as an UTC datestep is the aggregation level, it’a an enumeration and can be one of: [hour | day | week | month | year]The result format is the same as for the charging station measure aggregation route.
A log is the recording of a non-metric data on a time basis. A non-metric is a value on which aggregation operations (sum, average, …) cannot be done. There are two grid meter logs defined by the following metadata:
[
  {
    "logId": "1",
    "name": "CurrentTariff",
    "periodicity": "Immediate"
  },
  {
    "logId": "2",
    "name": "TicType",
    "periodicity": "Immediate"
  }
]
The first log is the recording of the active tariff on the grid meter over time and the second one is the recording of TIC type changes.
To get the metadata of all available logs of a grid meter, call the route:
GET /installations/{installationId}/grid-meters/{gridMeterId}/logs
where
{installationId} is the installation identifier{gridMeterId} is the grid meter identifierThis route returns an array of grid meter logs and permits you to retreive their identifier to be able to call individual routes.
To get the metadata of a specific log, call the route:
GET /installations/{installationId}/grid-meters/{gridMeterId}/logs/{logId}
where
{installationId} is the installation identifier{gridMeterId} is the grid meter identifier{logId} is the log identifierThis route returns the metadata of a specific log.
The only operators available on a log are count and list as logs are non-metric data. To count a log values call this route: POST /installations/{installationId}/grid-meters/{gridMeterId}/logs/{logId}/operators/count
where
{installationId} is the installation identifier{gridMeterId} is the grid meter identifier{logId} is the log identifierThis route takes the count aggregation parameters as payload formatted as follow:
{
  "startDate": "2020-06-02T00:58:24.458Z",
  "endDate": "2020-06-04T12:15:33.458Z",
  "step": "day"
}
startDate is the beginning of your search period formatted as an UTC dateendDate is the end of your search period formatted as an UTC datestep is the aggregation level for the count, it’a an enumeration and must be one of: [hour | day | week | month | year]The result values are grouped by date. Here is an example of a count by day of TicType log (logId = 2):
[
  {
    "date": "2020-04-16T00:00:00Z",
    "value": 22.0,
    "logName": "TicType"
  },
  {
    "date": "2020-04-20T00:00:00Z",
    "value": 4.0,
    "logName": "TicType"
  }
]
date is the UTC date of the result groupvalue is the count value for the datelogName is a reminder of the log name matching the log id given as input parametersTo get the history of a specific log values, call this route: POST /installations/{installationId}/grid-meters/{gridMeterId}/logs/{logId}/operators/list
where
{installationId} is the installation identifier{gridMeterId} is the grid meter identifier{logId} is the log identifierThis route takes the search span parameters as payload formatted as follow:
{
  "startDate": "2020-06-02T00:58:24.458Z",
  "endDate": "2020-06-04T12:15:33.458Z"
}
startDate is the beginning of your search period formatted as an UTC dateendDate is the end of your search period formatted as an UTC dateThis route returns the full history of the given log for the search span.
The CurrentTariff log has this result format:
[
  {
    "date": "2020-04-20T07:38:41Z",
    "value": {
      "currentTariff": "HPJB"
    },
    "logName": "CurrentTariff"
  },
  {
    "date": "2020-04-20T07:29:41Z",
    "value": {
      "currentTariff": "HCJB"
    },
    "logName": "CurrentTariff"
  }
]
The result for TicType logs is:
[
  {
    "date": "2020-04-20T07:38:41Z",
    "value": {
      "ticType": "historicMono"
    },
    "logName": "TicType"
  },
  {
    "date": "2020-04-20T07:29:41Z",
    "value": {
      "ticType": "idle"
    },
    "logName": "TicType"
  }
]
date is the UTC date of the result groupvalue is the full value of the log record, here an object with one property containing the currentTariff or ticType value at the group datelogName is a reminder of the log name matching the log id given as input parametersWitty Home system offers you the possibilty to view your house electrical consumptions cost by setting your tariffs prices. If you don’t set your own prices, default values are used to keep this feature available. A tariff is defined by the following model:
{
  "id": "th",
  "installationParentId": 0,
  "friendlyName": "my base tariff",
  "currency": "eur",
  "isDefault": true,
  "values": [
    {
      "beginDate": "2020-07-03T08:27:12.688Z",
      "value": 0.25
    }
  ]
}
id is the tariff identifier as described in Subscriptions and tariffs section,installationParentId is your installation identifier,friendlyName is a custom name that you can set for the tariff to identify it easily. A friendly name will be asked for Standard TIC custom tariffs (Tariff1 to Tariff10).currency is the price currency, it’a an enumeration and must be one of: [eur | gbp]isDefault indicates whether the tariff price is a system default value or your custom pricevalues is an array of all prices historic:
beginDate is the UTC date from which the price is taken into accountvalue is the price in the currency and for single KWhTo get the prices historic of all your tariffs call this route:
GET /installations/{installationId}/grid-meters/{gridMeterId}/tariffs
where
{installationId} is the installation identifier{gridMeterId} is the grid meter identifierThis route returns an array of tariff with for each tariff its price historic.
To get the prices historic of a single tariff, call this route:
GET /installations/{installationId}/grid-meters/{gridMeterId}/tariffs/{tariffId}
where
{installationId} is the installation identifier{gridMeterId} is the grid meter identifier{tariffId} is the tariff identifierThis route returns a single tariff with its prices over time.
Witty Home system permits you to define your own tariffs prices to have the most accurate consumption cost calculation, not only for your house consumption but mostly for your charging session consumption. If you don’t set custom tariffs, the system uses defaults prices to calculate costs anyway. To set your own tariff call the following route and give all the tariff that are needed for your subscription (cf Subscriptions and tariffs section). For example if you have a HCHP contract you must give a price for the two tariffs HC and HP.
POST /installations/{installationId}/grid-meters/{gridMeterId}/tariffs
where
{installationId} is the installation identifier{gridMeterId} is the grid meter identifierThe tariff payload must be formatted as follow, for example with a BASE subscription you need to send the only tariff TH:
[
  {
    "id": "th",
    "currency": "eur",
    "beginDate": "2020-07-03T13:25:37.120Z",
    "value": 0.33
  }
]
If you have a HCHP subscription:
[
  {
    "id": "hc",
    "currency": "eur",
    "beginDate": "2020-07-03T13:25:37.120Z",
    "value": 0.33
  },
  {
    "id": "hp",
    "currency": "eur",
    "beginDate": "2020-07-03T13:25:37.120Z",
    "value": 0.42
  }
]
For a STANDARD subscription you must pass the 10 custom tariffs even if you want to set the price for 3 of them:
[
  {
    "id": "tariff1",
    "friendlyName": "my low cost tariff",
    "currency": "eur",
    "beginDate": "2020-07-03T13:25:37.120Z",
    "value": 0.33
  },
  {
    "id": "tariff2",
    "friendlyName": "my high cost tariff",
    "currency": "eur",
    "beginDate": "2020-07-03T13:25:37.120Z",
    "value": 0.806
  },
  {
    "id": "tariff3",
    "friendlyName": "my special week-end tariff",
    "currency": "eur",
    "beginDate": "2020-07-03T13:25:37.120Z",
    "value": 0.42
  },
  {
    "id": "tariff4",
    "currency": "eur",
    "beginDate": "2020-07-03T13:25:37.120Z",
    "value": 0
  },
  {
    "id": "tariff5",
    "currency": "eur",
    "beginDate": "2020-07-03T13:25:37.120Z",
    "value": 0
  },
  {
    "id": "tariff6",
    "currency": "eur",
    "beginDate": "2020-07-03T13:25:37.120Z",
    "value": 0
  },
  {
    "id": "tariff7",
    "currency": "eur",
    "beginDate": "2020-07-03T13:25:37.120Z",
    "value": 0
  },
  {
    "id": "tariff8",
    "currency": "eur",
    "beginDate": "2020-07-03T13:25:37.120Z",
    "value": 0
  },
  {
    "id": "tariff9",
    "currency": "eur",
    "beginDate": "2020-07-03T13:25:37.120Z",
    "value": 0
  },
  {
    "id": "tariff10",
    "currency": "eur",
    "beginDate": "2020-07-03T13:25:37.120Z",
    "value": 0
  }
]
The route returns the full historic of all your subscription tariffs prices. If we stay on the example of a BASE subscription:
{
  "id": "th",
  "installationParentId": 0,
  "friendlyName": "my base tariff",
  "currency": "eur",
  "isDefault": false,
  "values": [
    {
      "beginDate": "2020-07-03T13:25:37.120Z",
      "value": 0.33
    },
    {
      "beginDate": "2020-01-02T10:00:00.000Z",
      "value": 0.22
    }
  ]
}